
Halloween Pumpkin MINIS, AI-HUMAN Hybrid Product DEVELOPMENT
Here’s our new logo style, what do you think? Yes, it was made with AI. OOOoooooOOOOOoooo Spooky!
Since it’s Halloween, we might as well talk about something spooky & scary - Artificial Intelligence! There’s definitely a reason to be scared of AI, as it has the potential (like any transformational technology) to change the entire world around us more quickly than humanity can collectively adapt. Already, AI has become a therapist for some people. The Promise of AI Tools has also been used as a reason for leaders in companies to cut employees since it’s believed “AI will be used to replace redundancies”. Not to mention, the classic sci-fi trope of the dangers of AI with movies like “The Terminator” and “The Matrix”.
So…there’s actually a lot of solid backing to be cautious of AI. But, there is also great utility and value for practical AI tools to make & produce new things that never existed before. For us, we use AI as a tool & partner to accomplish more than we could as just one human being.
In this case, we used an AI tool to prompt and generate a 3D Model of a Halloween Pumpkin and then optimized it for 3D Printing in bulk. It became a great example of how AI can help amplify the product development cycle and get ideas created faster and promote what’s possible as a free model giveaway.
In this blog post, we’ll explore how an idea for Halloween went from a thought, to an AI-generated 3D color model, and was a fascinating product development adventure. Not to mention, we ended up selling miniatures LIVE on our What Not show this week. Not bad for an idea that came to me during the month of October in between business & other projects for AG3D.
FROM IDEA TO AI
We’ve actually worked with pumpkin related 3D models before, as I’ve actually 3D scanned a pumpkin from a past Halloween and 3D Printed it. Capturing all of the unique curves and bumps of something once alive and now forever in 3D form with a 3D scanner is awesome. But, I did not have the time to work on that model to make a product in time for Halloween. So, on a whim, I decided to go back to an AI Tool I purchased called Meshy.ai and tried prompting to see what it would generate.
Amazingly, the 3D model of a Halloween Pumpkin was really good on the first try! You never know with these AI Tools, because they can really be hit or miss. But when they hit, it’s really miraculous. The AI tool Meshy.AI is meant for 3D Assets and Video Game characters so it has a ton of potential to be useful there. But it also has huge potential for 3D Models for use in 3D Printing, especially for color. There are some serious kinks to work out as far as creating a 3D model without any errors. And it has a very long way to go before the model created is 3D printable. But, for this Halloween Pumpkin Miniature, Meshy.ai SCORED!
If you’d like to try Meshy.AI for a Month, Use my link here to get a Free Month and I’ll get a Free Month too!
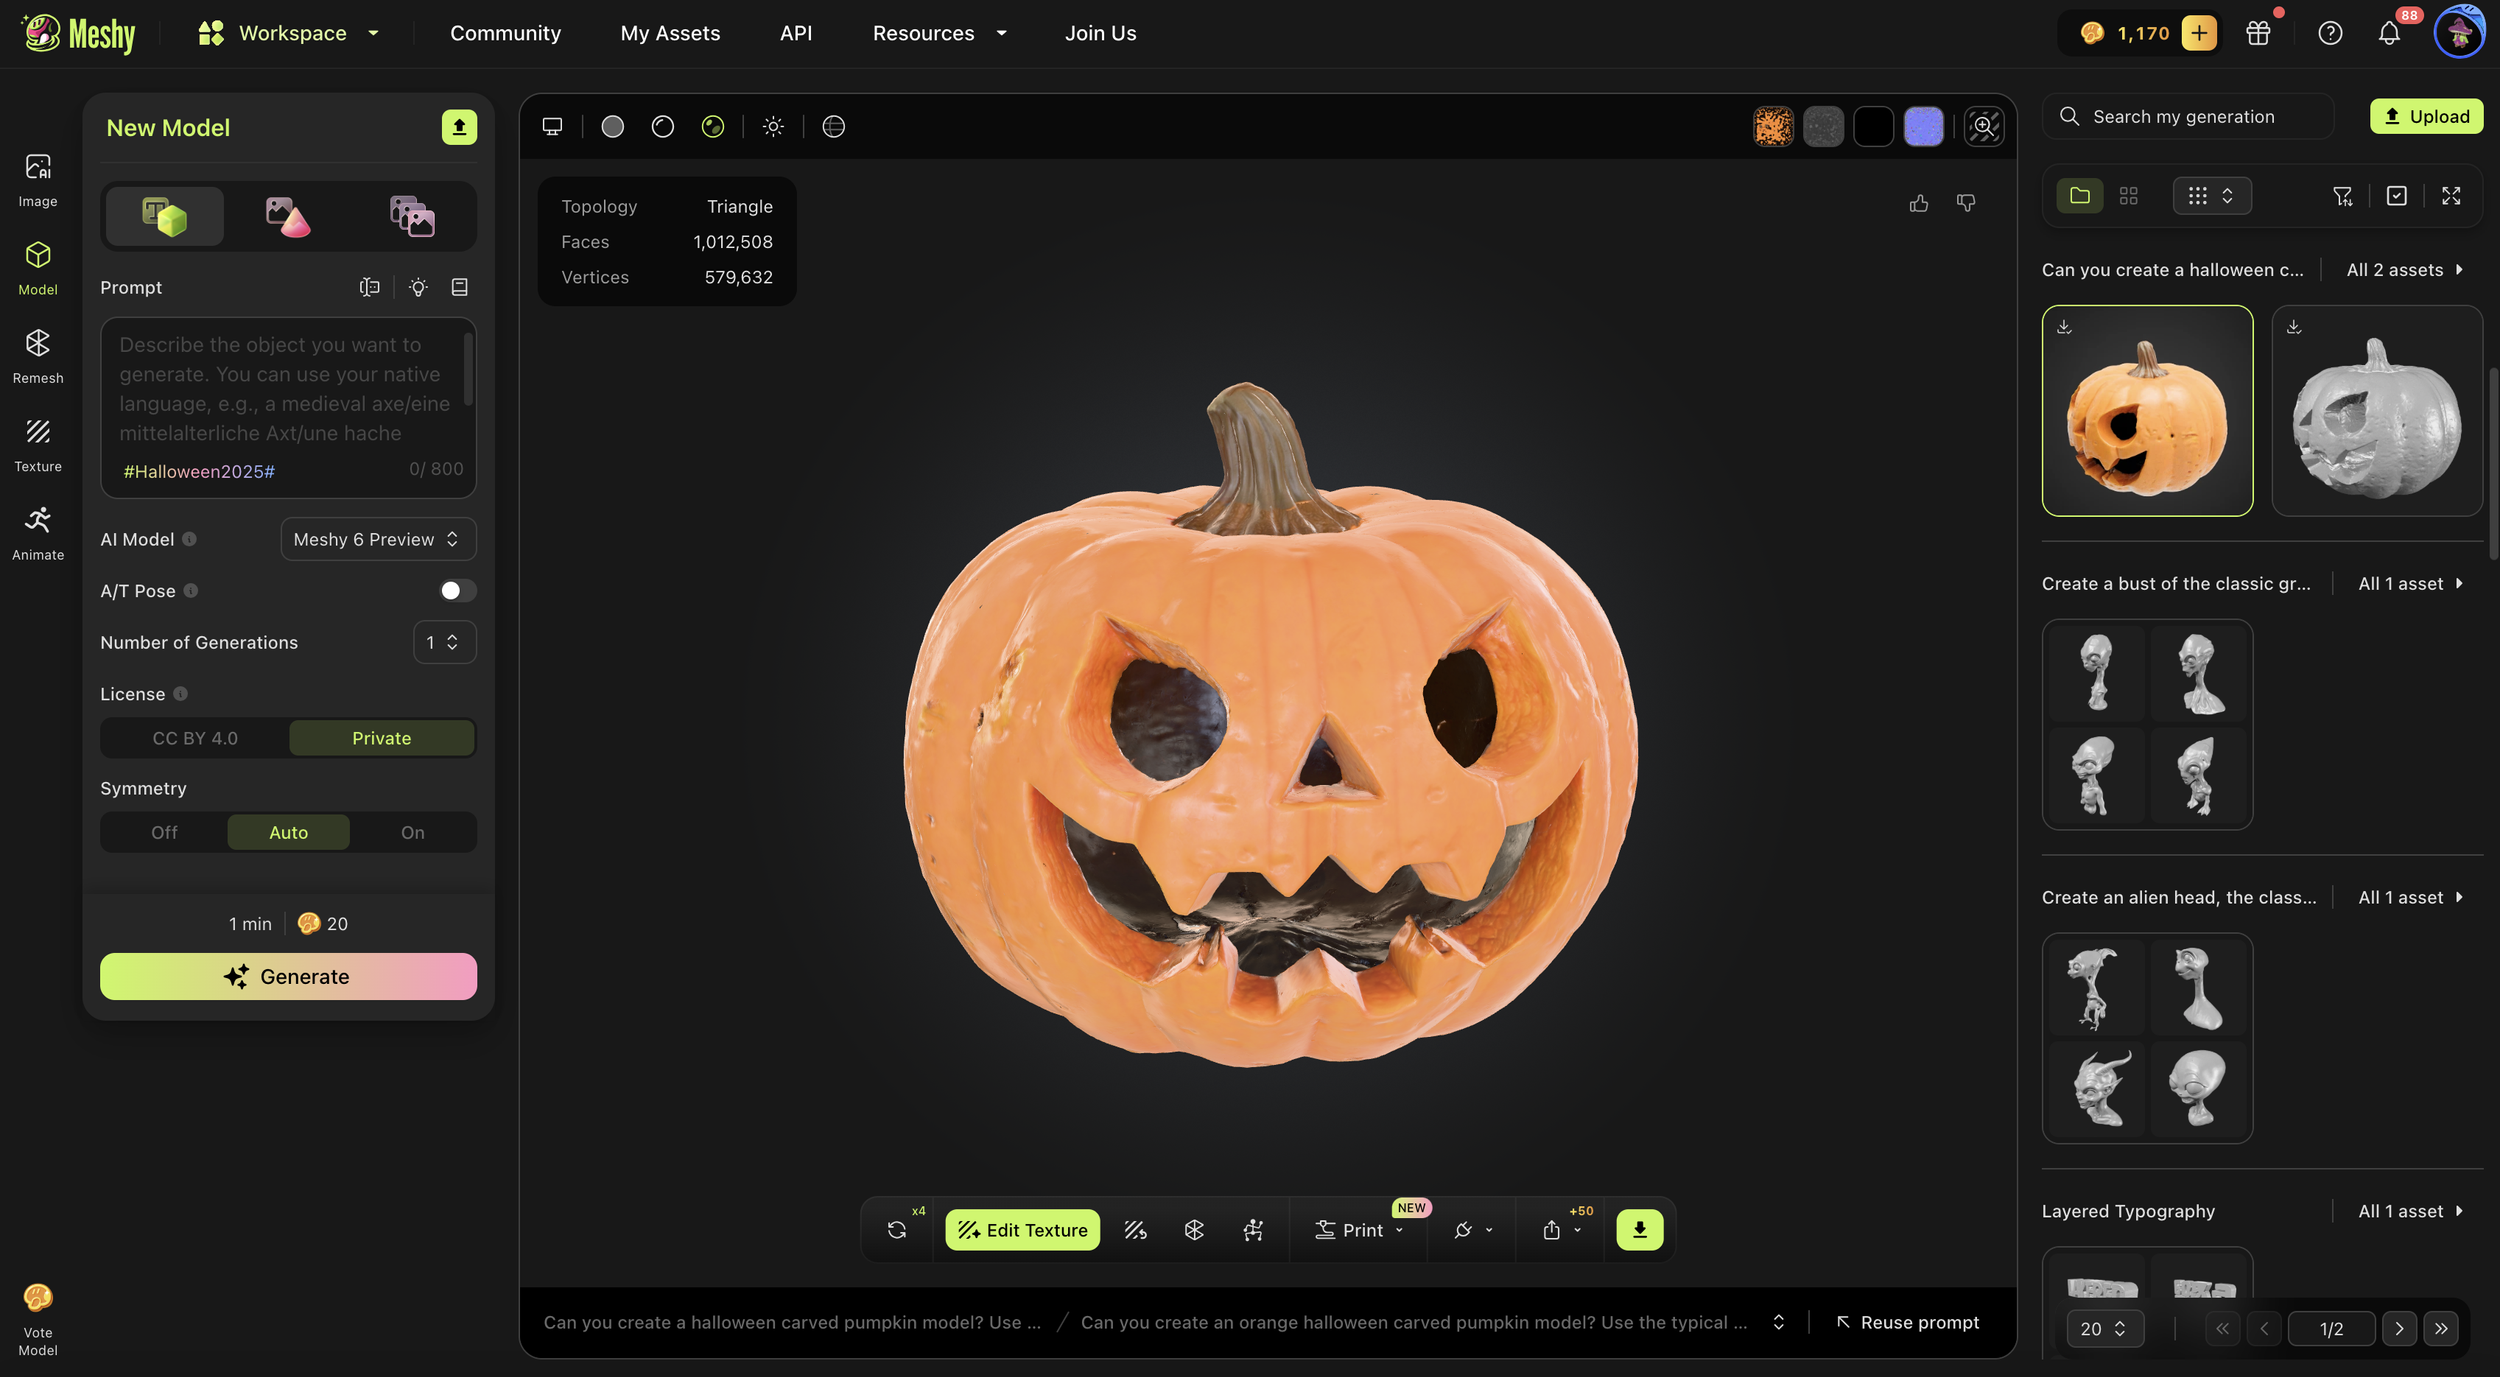
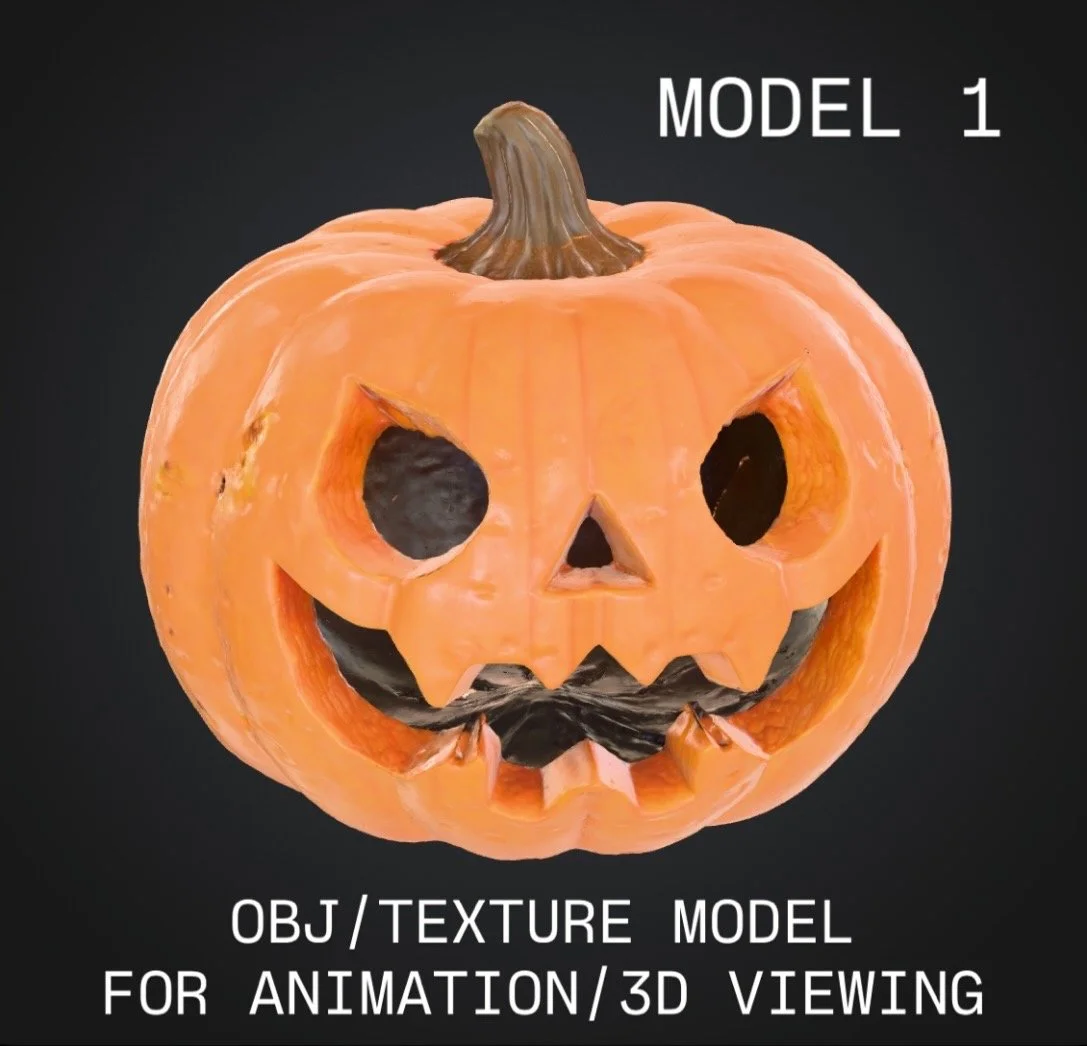
Here’s a screenshot of the workspace in Meshy.AI after generating the model from text and adding an image texture.
The model generated also came with a texture color mapping which was really impressive. The detail of the pumpkin is very good, especially since I already have some experience creating a real pumpkin 3D scan before. The color texture was also really good and if I had enough time I would have tried to see how good that color wrapping held up with a true color 3D printing process.
But in the meantime, this 3D model was perfect for use in any 3D environment, be it AR or Video Games and animation. For 3D printing however, we needed some Human Intelligence and skill to make some adjustments for part success.
FROM 3D MODEL TO 3D PRINTABLE
I pulled the 3D Model mesh into my CAD software and noticed immediately that some of the triangle faces of the model (ok many of them) were facing the wrong way. This can cause issues when you slice the part, as a triangle model face going the wrong way can make the slicer believe that its not there, leaving a hole when it’s 3D printing. With a little work, I was able to export a mesh with less issues and loaded it into Shapr3D (my CAD software) and adjusted the model to be more 3D printable.
HERE’S WHAT I CHANGED TO MAKE IT SUCCESSFUL:
I added a solid body to the inside of the model so it was no longer hollow like a carved pumpkin. While that would be cool for other projects like a candy holder or big Jack-O-Lantern to put on display - it wouldn’t make for a good 3D print. By adding a body to the cored out middle, the part could be 3D printed without any supports, making it faster and actually less expensive, not to mention just easier to make.
Then, I rotated the model upwards so that the Pumpkin’s face was lifted upwards. This gave the model a little “life” and excitement for when it would be sitting on a surface on display.
Finally, after rotating the model, I cut the bottom of the model so that the model has a solid layer to build on when 3D printing. It also reduced the amount of supports or rough surfaces it would have had it we kept the organic bottom with all of those curves and bumps not ideal for the 1st layer of the part.


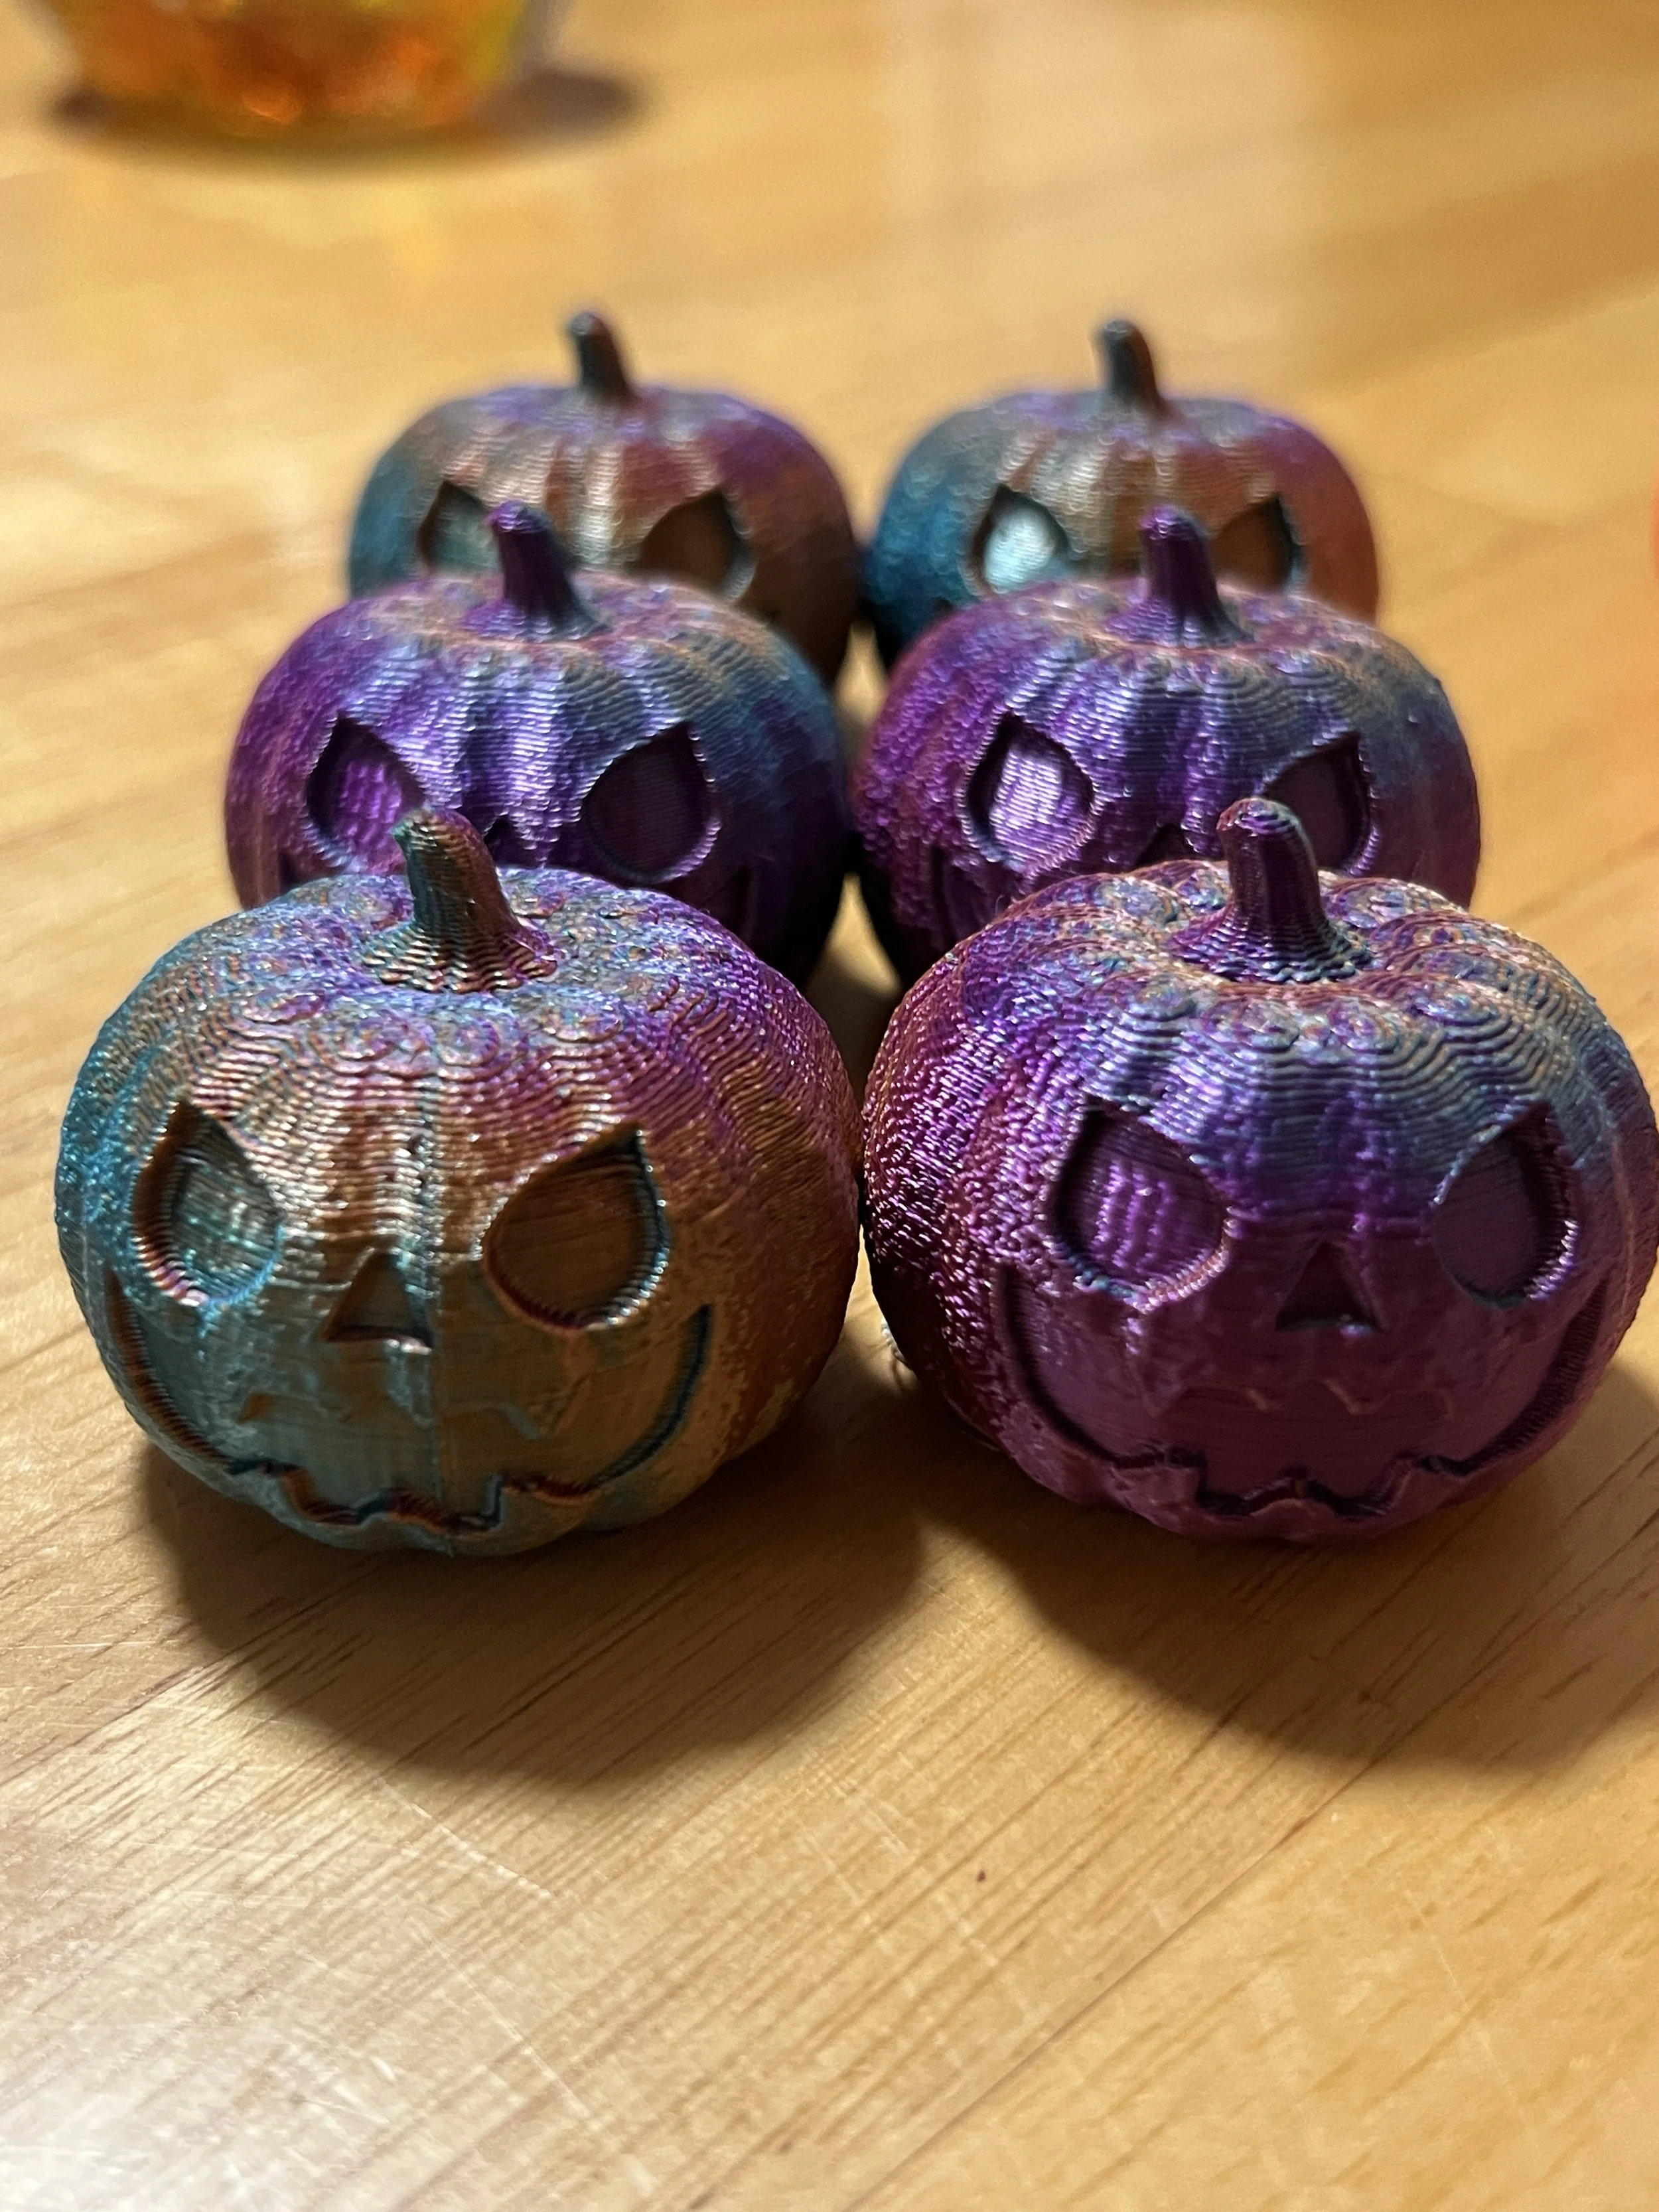
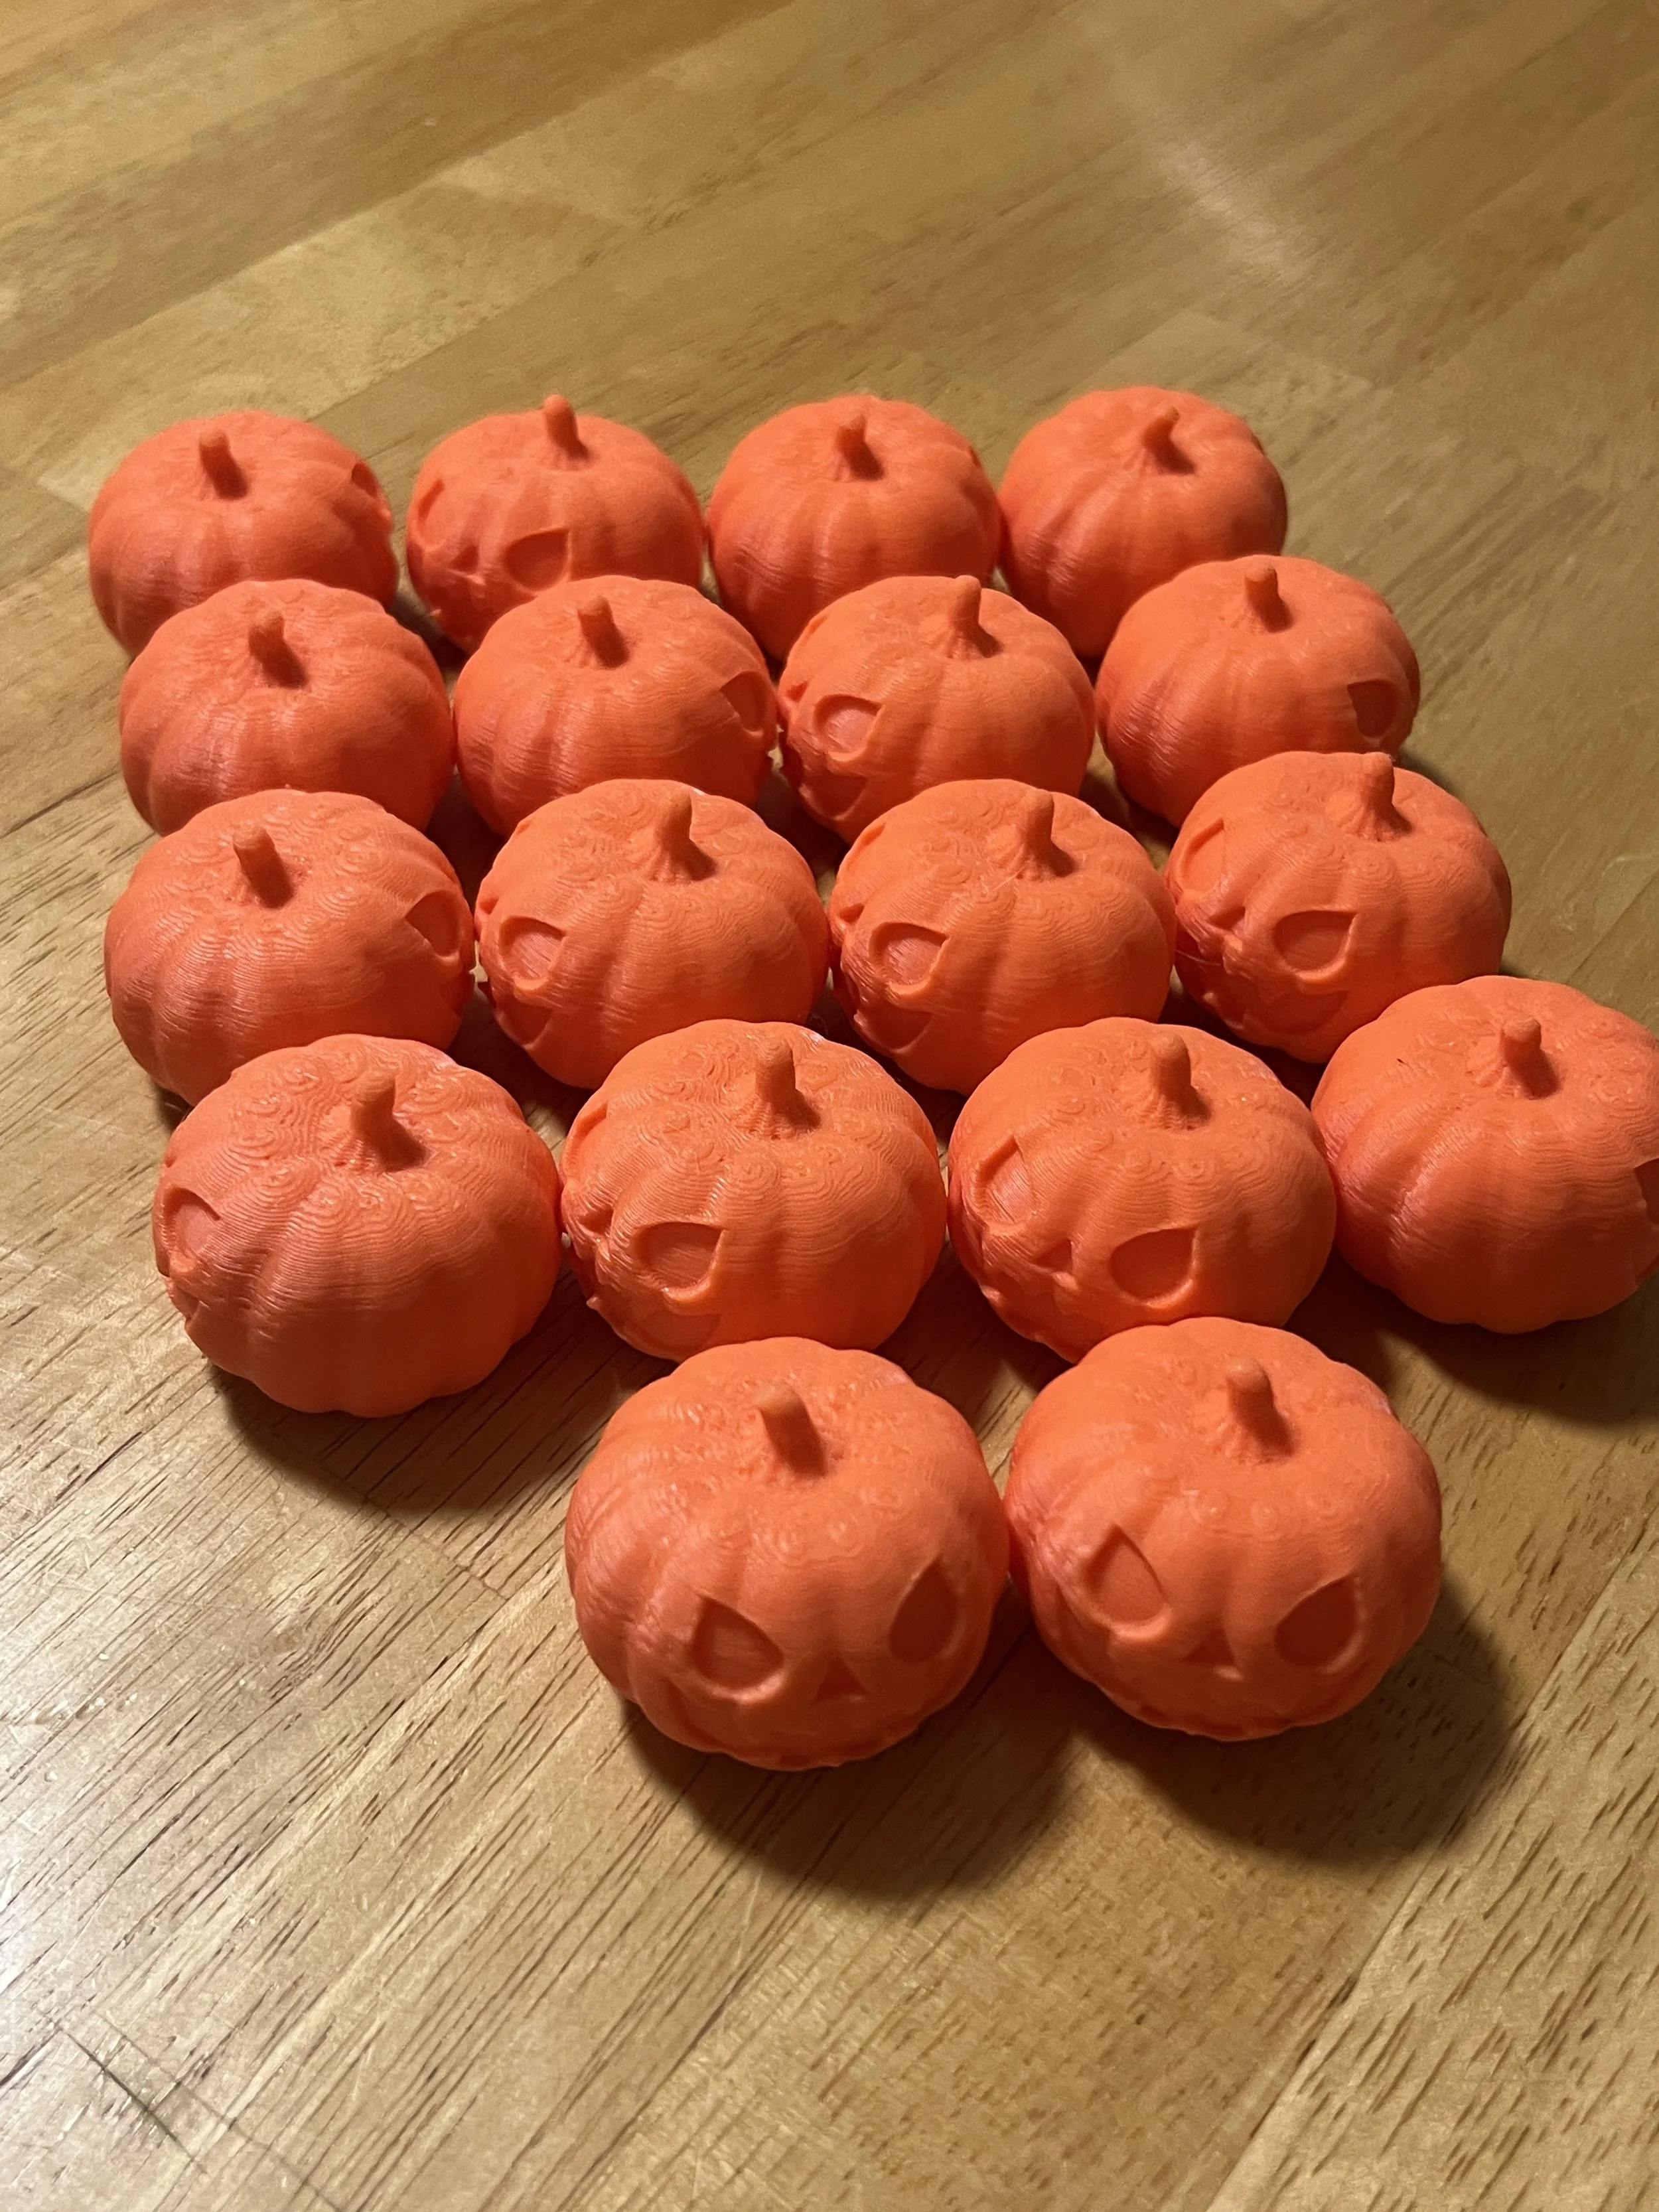
After 3D Printing 2 or 3 of these, it was clear the 3D printable version was ready for prime time. I started 3D printing them in Orange to start, and then I got the idea to gamify and make some other rarities with the other colored filaments I had. We used an iridescent (green/purple) and rainbow (blue, orange, purple, green) and only made 5 or 6 of those. The “base” rarity would be orange. The 3D print itself ranged from 6-9 hours for 6 mini pumpkins to be made at a time. The flat bottom made consistent 3D printing effortless. We probably could have scaled up from 6 to maybe 10 at a time, but I was happy with the job length and just kept it.


TESTING PRODUCT IDEAS:
During the week I was 3D printing the miniatures, I also had an idea for a fidget pumpkin, using the cored out version of the model, splitting it in half at the mouth, and adding a spring or keystroke to have fun pressing the head down repeatedly. It turns out that single keyboard strokes are actually available to purchase and they aren’t expensive.
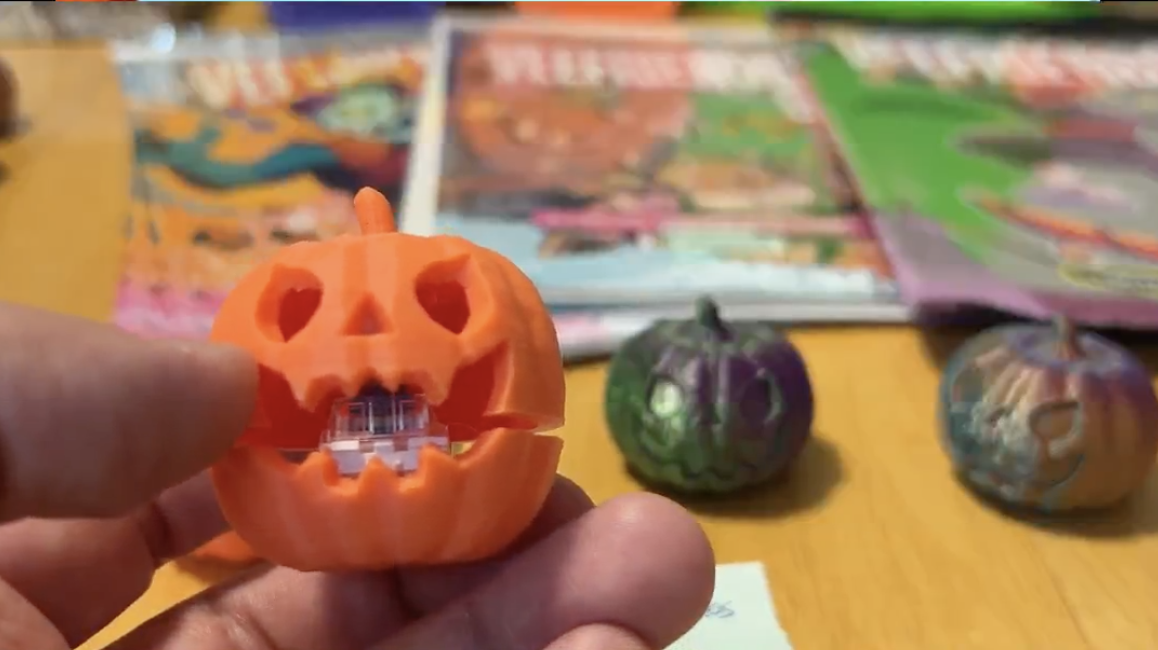
Here’s a screenshot of the Pumpkin Fidget we sold live during our WhatNot show!
The reason I went with this instead of just a spring is that the keystroke is a spring, but with a dedicated guide to move up and down. If I had just a spring for the mouth to open, it would be more like a bobble head and not consistent. The keystroke made it things repeatable and consistent which for a fidget is important.
Unfortunately, I did not have enough time to finish this product but was able to get a prototype. Even though I have some work to do to get the right height and action on the mouth opening/closing - it will be a great thing for another holiday fidget. If you have any ideas, let me know! Email me at ag3dpartdetective@gmail.com. Would love to hear from you!
Another avenue I would have gone down if I had more time was to add a tea light inside the cored out model. That would have required taking the original 3D model and scaling it up to the have the tea light fit inside the pumpkin. I would have cored the bottom out so the tea light could just fit in the cored section and I could have secured in place with some glue. Again, never enough time but its an idea that has some legs. Maybe next year?
SELLING 3D PRINTED PARTS LIVE ON WHATNOT
I have been exploring selling LIVE on platforms like WhatNot and flipping things on eBay. But the Live experience of selling has been very interesting as a small business owner. While I still have a lot to learn on how to be good at this, I have had some great shows so far. Selling live can be a great addition to revenue while we’re building our business.
While we did go live and 3D print a lot of lil Pumpkins for the show, it was a little last minute (week of Halloween). We did have some amazing conversations with the chat, talking about life, 3D Printing, and the challenges of being a “chaotic creator” - we did not reach out expectations for selling these pumpkin minis.
Interestingly enough though, the one item we did sell was an auction for the prototype fidget using the key insert. I am truly grateful that people are interested in the things I am making with 3D Printing. I did NOT expect to sell a prototype design on multiple shows over the finalized products. It’s surprising and fascinating, something to note for anyone else out there 3D printing things and trying to find customers.
WHY I USED AI DESIGN
You might be wondering why I chose to use AI Design at all. Wouldn’t I be worried that I am contributing to eventually replacing myself if these AI tools get too good? Yes, that’s certainly a part of it, and also why I choose try some of these tools now to see how good they are. I’ll either rise to the occasion or end up using it myself because its that much better for particular designs.
The long and short of it is - for 3D printing - these AI Tools are still not anywhere close to creating reliable 3D models for making parts. But generating organic and complex shapes and textured patterns is definitely possible and not an easy thing to do. But this paid AI tool seems to do it well. What I do is usually run an idea through this program first, and see how the model turns out. I look for two things before I decide if it’s worth using:
Did this save me time? Even if the model is broken and could have issues, did I save time by generating it this way instead of creating it myself from scratch?
Did it save myself and the customer on the cost of creating the 3D model? This type of 3D Modeling for organic shapes is not something I have a lot of experience in. Could I learn it in more depth? Absolutely - but is it worth my time? Or do I even have the time? Usually the answer is no, I do not.
I often see customers ghost me after finding out how much making the 3D model would be if I created it myself. While this is partly due to my work with individuals and small businesses, it is a reality for most people. So this AI tool can be very handy to allow more people to utilize 3D Printing services like my own if we can generate a 3D Model this way. It’s less time, less expensive, and opens up the “trinket” & “toy” options for people that don’t have the budget to develop a product.
So anything that allows more people to access 3D printing is a win for me. Even if that means I don’t get paid my rate for 3D modeling. In the interest of scaling my business, less time spent on a hands-on project opens me up to finding more opportunities and developing new ideas. It’s a win-win for the right application.
GET YOUR FREE 3D MODEL FOR HALLOWEEN
This week of Halloween we will be giving away both 3D models (the visual cored out & colored 3D model idea for use in 3D spaces and the 3D printable version). We also have included a PDF with instructions on what they are, how to use them, and some good use cases and instructions on 3D printing them. You can download them for free by signing up for my newsletter at stan.store/ag3dlabs. Once you add your name and email and hit Send, you’ll get an email with the download links.


If you do download them and make something with them please reach out & let us know! Would love to hear from you. It’s also totally cool to just download them and have it as artwork because at the end of the day 3D models are also pieces of art.
In this case, a 3D model generated by AI from the idea of this human being and a modified and improved 3D model for use in 3D printing.
Either way, this was a fun project and I’m happy I get to share this with you! So make sure to sign up and get your downloads before midnight on Halloween! After that they disappear with the spirits until next year.
Until the Next 3D Printing Adventure…
This is The Part Detective reminding you to “Keep 3D Printing!”
DYK We Started a 3D Printing Podcast w/ our Friend Matt of Niche3D?
Check out Season 1 here and Make sure to Subscribe for more clips and Season 2! We’ll be recording soon.